Star Citizen Game Launcher Analysis
All content below is for educational purposes only
I have always been interested to know how game launchers work. This blog post deep dives into game launcher internals. This will be an in-depth walkthrough into the depth of an Electron application and native C++ code. The last part will be about rebuilding things differently: building a custom tool to explore the RSI Object Store.
From initial fingerprinting to building a proof of concept application with gained knowledge, we will explore Electron C++ bindings, Javascript reverse engineering, custom API scheme, API reverse engineering and file format reverse engineering.
The target used is the Star Citizen launcher (Delta patcher), it will mostly be referred to either as the Delta patcher or RSI launcher.
Target fingerprinting and extraction
0. Target fingerprinting
The first step in reverse engineering a target is about gaining as much information as possible before starting reverse engineering it.
There are already multiple tools designed for this task to help us in this journey: Detect It' Easy (DiE), PEiD or ExEInfo to name a few. Those are signature-based scanners specialized in determining file types and detecting used compilers, compressors and/or protection mechanisms.
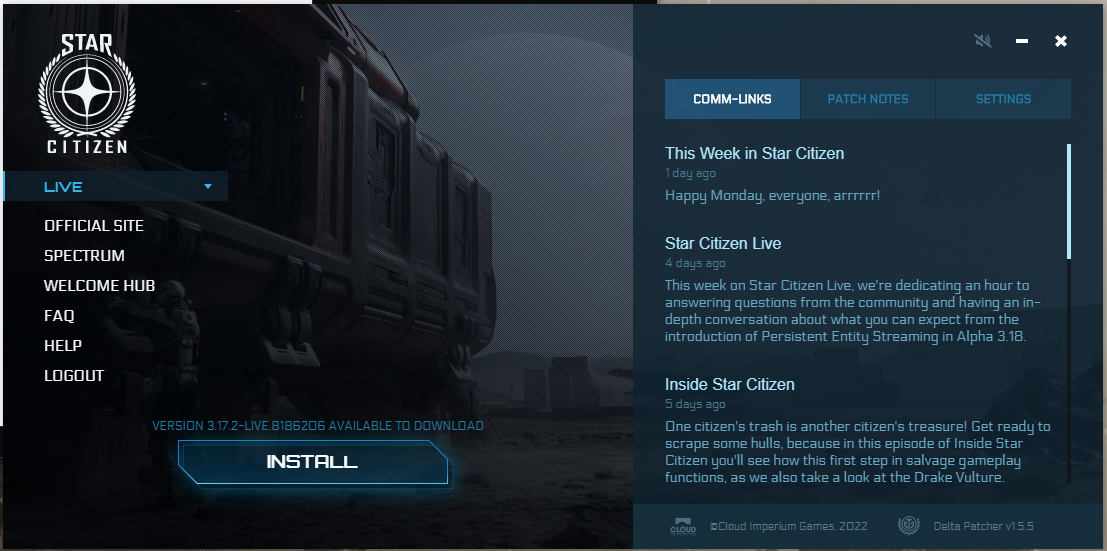
In this article, I chose to use DiE as I am used to using it, nothing more. After downloading the launcher from the publisher’s website I ended up with a single executable to run letting me think this is probably a self-extracting archive that will install the real executable (or launcher) as well as all the necessary components to run it.
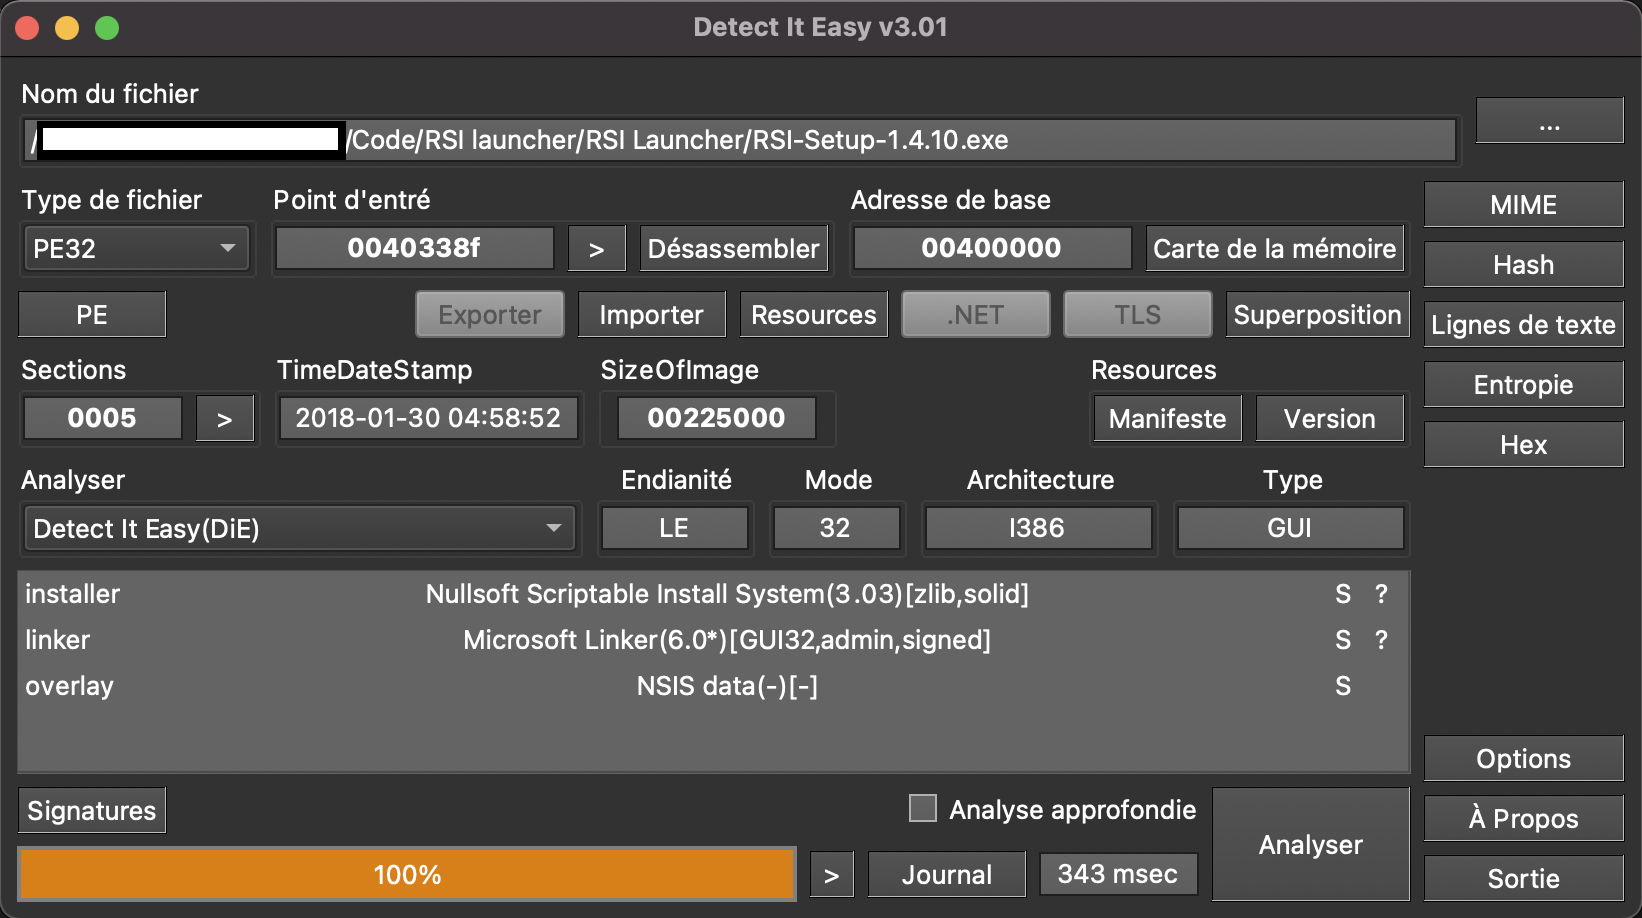 Detect it Easy confirms our initial thoughts
Nullsoft Scriptable Install System (or NSIS) is a well-known system to create Windows installers. This executable is in charge of installing all the necessary files for the actual launcher to be able to run. Since the NSIS script is only a shell deploying its content we will extract this content.
Hopefully for us there the NSIS format is well known today and there are multiple tools that can extract the content of common self-extracting archives for us (7zip, The Unarchiver, …).
1. Extracting content
Extracting it with The Unarchiver leaves us with numerous files. After digging a while through files, one arose my curiosity: app-64.7z.
After extracting the app-64 archive, we can inspect the content, we can see our desired target RSI Launcher.exe, passing it to DiE doesn’t reveal much, just a common executable.
However, digging through files before continuing I noticed a folder named resources which contains two interesting files: app.asar and electron.asar.
From there we can assess that the target executable is an Electron JS application bundled as a PE executable.
Fortunately for us, Electron JS application source code can be easily unpacked from the app.asar archive with the use of the asar npm package (You need to install node to get npm to install the asar package).
Let’s install asar first :
npm install -g --engine-strict asarCreate the destination folder :
mkdir unpackedExtract the source code from the archive :
asar extract app.asar unpackedOnce the archive is extracted we can inspect the content (below is the result of ls command):
app		index.html	node_modules	renderer.js
assets		main.js		package.json	src
The unpacked code still needs to be de-minified to be in a readable state but this will be enough to start investigating how it works.
Exploring the RSI launcher
We extracted source code in the previous part of this blog post, we will now explore the extracted source code to understand how the software is built.
0. Digging into the source
Fortunately for us, a packaged Electron application keeps the folder structure when packaged as an executable.
app             index.html      node_modules    renderer.js
assets          main.js         package.json    src
The app folder contains the built application (amalgamated and minified source code). It is a key file while reverse engineering Electron application but is hard to parse as variables are renamed and statements are crowded unusually for a human javascript developer.
There is an src folder as well with a well-structured folder tree.
src
├── main
│   ├── analytics.js
│   ├── auto-update.js
│   ├── basic-auth-login.js
│   ├── check-vcredist.js
│   ├── electron-util.js
│   ├── game-launcher.js
│   ├── launcher-tray.js
│   ├── logger.js
│   ├── node-util.js
│   └── rsi-window.js
└── shared
    └── sentry.js
Every file name is relevant, things look promising.
Below is a glance at each file in the src folder.
src/main/analytics.js-> Classic Google analytics telemetrysrc/main/auto-update.js-> Based on the electron-updater package (https://www.electron.build/auto-update), checks every 15 mins for updates.src/main/basic-auth-login.js-> A basic authentication (username and password) class.src/main/check-vcredist.js-> Checks Windows registry for VCRedist registry key existence, if not it runs the embedded VCRedist installer.src/main/electron-util.js-> Cookies 🍪 management helpers.src/main/game-launcher.js-> Manages launch of the actual game executable after checkingf_win_game_client_release.idfile content. Handles credential forwarding throughloginData.jsonfiles.src/main/launcher-tray.js-> Manages the tray icon.src/main/logger.js-> Manage logging to files.src/main/node-util.js-> File 🗒 management helpers.src/main/rsi-window.js-> Manage GUI windows and navigation events.shared/sentry.js-> 🤖
The node_modules folder is containing source code for all the packages the application is built with as in any node application.
The assets folder contains assets for the launcher such as ambiance music files, icons and fonts.
There are a few files I didn’t talk yet about: main.js, renderer.js and index.html.
The HTML file can be considered the entry point of the launcher application. During initialization, it loads renderer.js as well as the previously mentioned cig-launcher.js and then runs it.
The renderer is in charge of registering allowed URL schemes. A new URL scheme named rsi:// is created for the application to use. Depending on the current environment (think dev, QA, prod) it maps an URL to the scheme.
https://robertsspaceindustries.com/api/launcher/v3 is mapped to rsi:// (or rsi:// is an alias for https://robertsspaceindustries.com/api/launcher/v3).
The result is that while digging through the source code you can stumble upon code like this: http.get('rsi://blablabla').then(...)
You just need to mentally translate it as this is a get request to https://robertsspaceindustries.com/api/launcher/v3/blablabla.
All the following APIs are accessible with HTTP POST requests.
/account/claims-> returns account claims/games/claims-> returns games claims/games/library-> returns the list of owned games and available channels (LIVE, PTU, …)/games/release-> returns information about a specific game version (game id and channel)/signin-> Sign-in route/signin/captcha-> Captcha route/signin/multiStep-> Authenticator route
Those are the core of the game launcher API. Once signed in one can explore its game library and get the release (or version) of a game. The manifest link can be retrieved once the game and its version has been selected.
1. Signing-in
The sign-in process is pretty trivial:
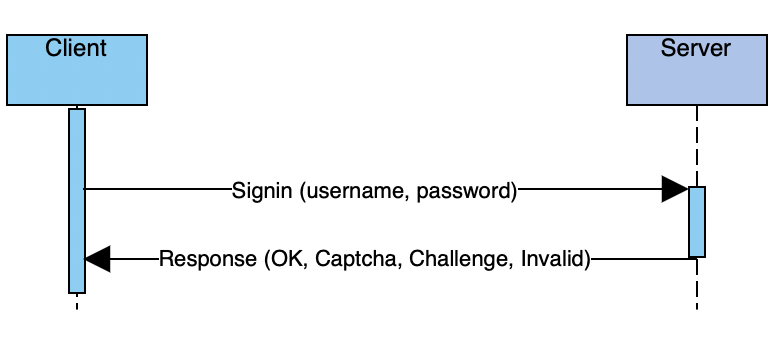 Signing sequence diagram
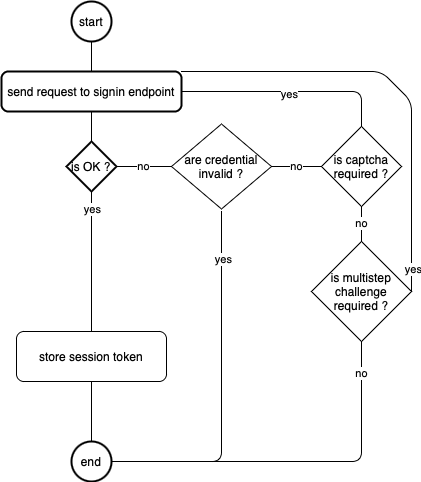 Signing workflow diagram
The captcha is pretty interesting to see as it looks like they generate their kind of captcha (but I won’t spoil you, you can discover it by failing to authenticate a few times 🙄).
2. Downloading a manifest file
As explained before, our current primary target is to be able to download a manifest file.

A manifest URL can be retrieved from the /games/release API route by providing a game id and a channel id from the /games/library API route :
async getRelease( gameId, channelId ) {
    const claims = await this.getClaims();
    return await this.client.post( '/games/release', { gameId: gameId, channelId: channelId, claims: claims.data } );
}
The returned data contains a manifest entry which contains an url field and a signatures field that can be used to construct the manifest download URL.
async downloadManifest( releaseInfo, path, progressCallback = null, completeCallback = null ) {
    return await this.client.downloadFile( `${releaseInfo.manifest.url}?${releaseInfo.manifest.signatures}`, path, null, progressCallback, completeCallback );
}
File format reverse engineering
A manifest file is a file containing metadata (mostly names, hashes, and sizes) about files needed for a specific version of a game. You can learn more about this type of file here.
As a side note, I’d like to emphasize a lot how Kaitai Struct is such a wonderful tool when it comes to file format reverse engineering.
This tool as well as a disassembler is used to gain knowledge about the file format.
0. The Magic
Almost every file format has something in common: the file header.
 Kaitai Struct Visualizer (ksv) hex dump panel
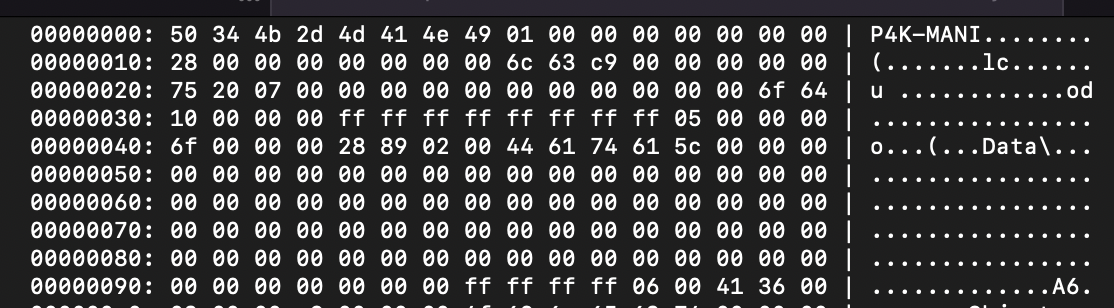
Here we can see the file signature field that allows us to figure out the file type from the first field of the header. The magic value of P4K-MANI (50 34 4b 2d 4d 41 4e 49) is a value that can either be checked as a string or a 64-bit integer for a fast file type check.
Other header fields can be guessed off like four 64-bit integers at offsets 0x8, 0x10, 0x18 and 0x20. The first two integers look like some size and offset and the other two aren’t straightforward and look like random integers.
We can also see part of strings scattered in the file without any sense, I think this is where figuring out the file format by staring at it in ksv just stop.
1. Javascript bindings
We are not able to find any code reference about manifest file parsing in the Javascript code.
This is because parsing the manifest file is an intensive task and they choose to code it in C/C++ and use Javascript bindings to call into native code from the Javascript launcher application.
From the extracted content from app.asar, we can find a node module (under node_modules/) named cig-data-patcher. This module contains native code and exports a patching API to the JavaScript launcher to perform the update patch.
The CigDataPatcher.node file is a Windows Dynamic Link Library :
% file CigDataPatcher.node
CigDataPatcher.node: PE32+ executable (DLL) (GUI) x86-64, for MS Windows
2. Native module
Looking at the exported symbols we can notice the exported pointer named _register_CigDataPatcher_. It is a static pointer that exports the routine located at 0x1800133b0.
The routine is very small and passes a data pointer to the node_module_register routine.
1800133b0  488d0d393e0e00     lea     rcx, [rel data_1800f71f0]
1800133b7  48ff259ad70a00     jmp     qword [rel node_module_register]
The data at 0x1800f71f0 contains two pointers, the first one being a reference to the C:\\Users\\rcyr\\Desktop\\cig-data-patcher-bindings\\cig-data-patcher\\src\\cig_installer.cpp string and the second one being a pointer to a subroutine (sub_180012fd0).
This routine is quite big and interesting. It first calls the sub_18000e3d0 routine then get a reference to the current v8 isolate and creates escapable handles multiple times. Since all this stuff is purely v8 stuff we won’t focus on it but rather dig into the sub_18000e3d0 routine.
The sub_18000e3d0 routine does a lot of stuff with the v8 engine but also interestingly calls sub_18000d350 multiple times.
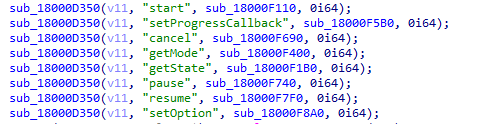
The sub_18000d350 routine sets the bound methods (like start) native callbacks and looks like a good starting point to find the manifest parsing routine. However, after some time with no finding, I had to fall back on another method to find my point of interest.
3. The Header
Since we know the manifest file has a signature value of P4K-MANI (when represented as a string) I started to look for the P4K-MANI string in the binary. Unfortunately, neither IDA nor Binja yields any results. Since the DLL is compiled with x86-64 as the target machine architecture and the P4K-MANI strings fit perfectly in a 64-bit integer when encoded as an ASCII string, I choose to look for 0x494e414d2d4b3450 immediate value.
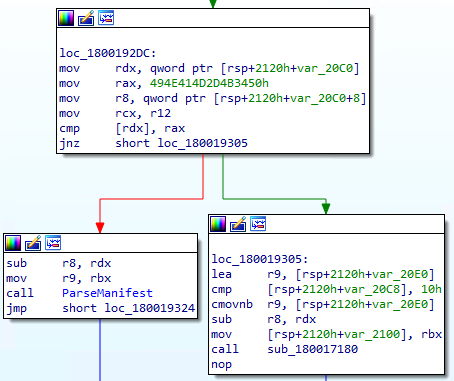
In the screenshot above, we see that the value pointed by rdx register is compared to the 0x494e414d2d4b3450 immediate value and the branch is taken if the value is different. We can then assume that the rdx register is holding a pointer to the manifest file memory buffer.

In the second screenshot, we can see that the manifest buffer pointer is copied to the r15 register. This register is not modified through the subroutine. We can then track all the memory access to the buffer by tracking the assembly instruction that uses this register along the subroutine.


We can now identify a few values from the header structure. We see that a quad-word is accessed at the offset 0x10, a double-word is accessed from the offset 0x18 and another quad-word is read from the offset 0x20.
With this quick analysis we can determine a draft of the manifest file header structure :
struct ManifestHeader {
    u8 Signature;   // 0x0000
    u4 unknown_08;  // 0x0008
    u4 unknown_0c;  // 0x000c
    u8 field_10;    // 0x0010
    u8 field_18;    // 0x0018
    u8 field_20;    // 0x0020
};

typedef struct ManifestHeader ManifestHeader;
The Signature field holds the magic value used to recognize the file as a manifest file. The two next fields are unknown. The three other fields will be discovered afterward.

The field at the offset 0x10 is used for pointer computation. From the hex dump tool, we can figure out the value of this member is 0x28.

This is exactly the header size we figured out, the v11 variable is then holding the address of the data after the header. This pattern is often seen in file format engineering. Holding the size of the header inside the header itself allows for easy back/forward compatibility and makes the file format agnostic from the code parsing it. One can find a similarity with the e_lfanew field from the IMAGE_DOS_HEADER structure used in the Portable Executable file format.
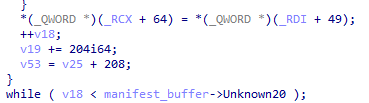
We can further see that the field at 0x10 is again reused to compute a memory location but with additional values this time. We see that the field at 0x18 is used as well as the v18 variable used as a counter.
From the second screenshot below we can figure out that the field at offset 0x20 is the number of entries in an array.
Finally, the v19 variable is used as a memory displacement to access the desired entry.

From all this information we can deduce the final form of the header structure.
struct ManifestHeader {
    u8 Signature;           // 0x0000
    u4 Unknown_08;          // 0x0008
    u4 Unknown_0c;          // 0x000c
    u8 HeaderSize;          // 0x0010
    u8 FirstRecordOffset;   // 0x0018
    u8 NumRecords;          // 0x0020
};

typedef struct ManifestHeader ManifestHeader;
Having the size of the header, the size of the first record and the size of a record, it is easy to compute the first location to start investigating further.
Given the following pseudo C code manifest_buffer + manifest_buffer->HeaderSize + v19 + manifest_buffer->FirstRecordOffset we can compute the location by replacing values to 0x0 + 0x28 + 0x0 + 0xc9636c = 0xc96394 (v19 is initially set to zero and is our increment value, manifest_buffer can safely be set to zero when dealing with the manifest file directly through a hex editor).
4. The record
The structure of the records was not trivial to reverse engineer but thanks to legacy code left in the binary I was able to map the old JSON-based manifest format to the current file format.
Digging through the binary I have come across some serious hints (read strings) like those shown below.
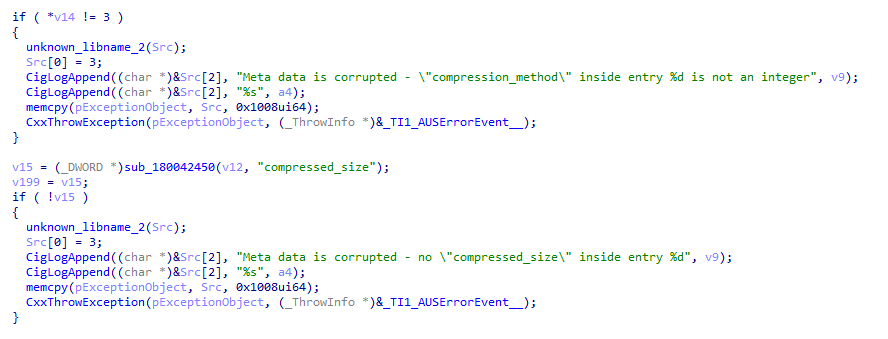
The first screenshot show legacy code that is executed when the first 8 bytes from the manifest file are not equals to [ 0x50, 0x34, 0x4B, 0x2D, 0x4D, 0x41, 0x4E, 0x49 ] which is the value expected from Signature field of the manifest header (discussed in part 3).
From those hints I have been able to identify the following fields :
#define RECORD_SHA256_SIZE      32
#define RECORD_SIGNATURE_SIZE   128

struct Record {
    s4 Id;                                  // 0x0000
    u4 Unknown_04;                          // 0x0004
    u4 Unknown_08;                          // 0x0008
    u1 Sha256[ RECORD_SHA256_SIZE ];        // 0x000c
    u8 CompressionMethod;                   // 0x002c
    u8 CompressedSize;                      // 0x0034
    u8 UncompressedSize;                    // 0x003c
    u4 Crc32;                               // 0x0044
    u1 Signature[ RECORD_SIGNATURE_SIZE ];  // 0x0048
    u4 Unknown_c8;                          // 0x00c8
};

typedef struct Record Record;
The CompressionMethod field value is either 0 or 100. The second value indicates a compression using the Zstandard compression algorithm (link).

I’ve been able to confirm the findings about the Sha256 field using an HTTP sniffer (like Charles Proxy) as the buffer is used as a hex string in the object store URL.
5. Trees
The missing bit is filenames to match our records. If you remember the previous section about the header there is a FirstRecordOffset field that locates the start of the records array. The value stored in this member is somewhat big for that kind of value so there is a gap between the header and the start of the array.

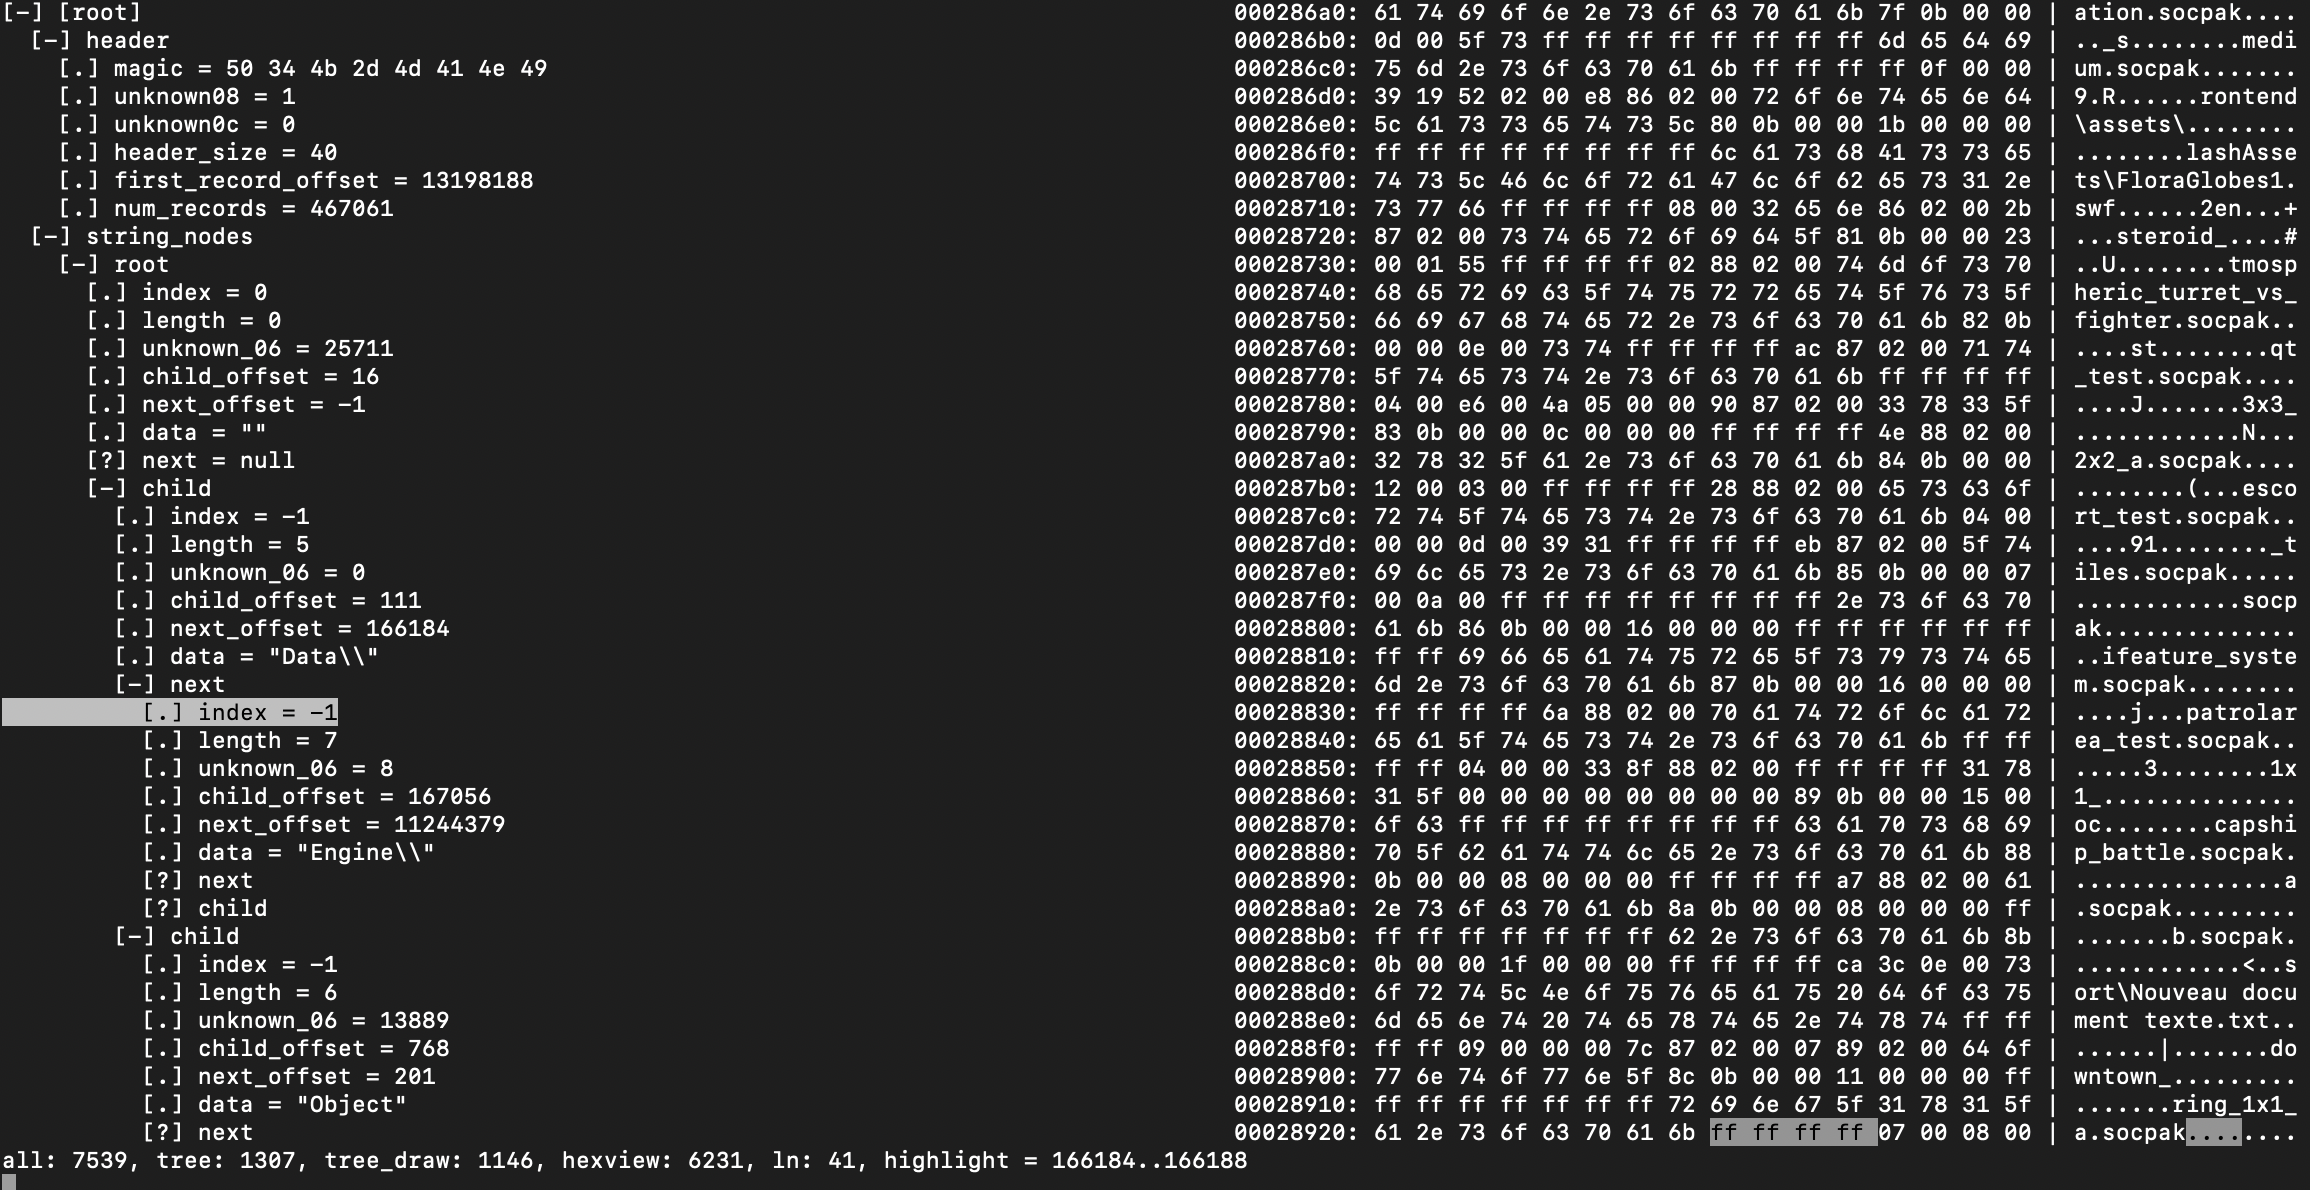
By inspecting the data right after the header we can see a bunch of parts of strings. A common way to optimize string storage in file format is using a data structure called Trie (or prefix-tree). This data structure allows storing parts of strings and reusing common parts in different strings.
A complete overview can be found here.
By looking at adjacent data it is trivial to figure out the data structure used for each entry. The prefix-tree data structure is resolving the next elements by storing references to them. From this assumption and the fact that we are storing strings (so we need the length of the part obviously — if you ever think storing strings in a file format without storing the length of it I have bad news for you 😂) we can figure out which fields store the offset to the next ones.

We see the string data is positioned at the offset 0x10 of the structure and the length is at offset 0x4.
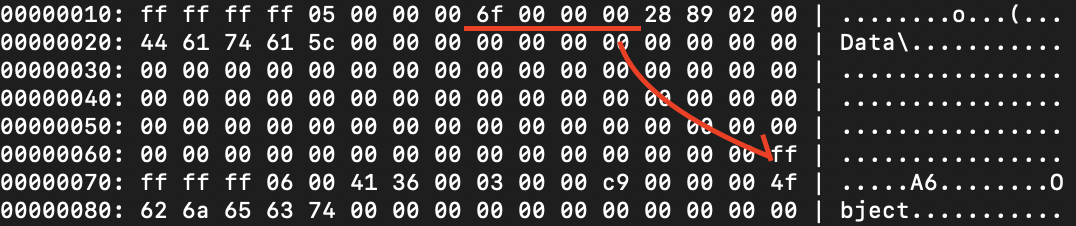
In the second screenshot, we see that the data at offset 0x8 is 0x6f and is pointing to a similar data structure. The displacement is not from the entry itself but rather the start of the tree on disk. This is a raw offset. This can be verified by taking the value at offset 0x10 (a tree entry holds a reference to the next part of the string and to another unrelated path which both have the current entry as a parent) which is 0x28928. Going to this offset through a hex editor will lead you to the entry containing the string Engine\.
The index field is set to a value matching a record entry, this happens when the current entry is the end of a path (else the index is set to -1 or 0xffffffff).
Finally, we can figure out the following data structure.
#define ANY_SIZE    1

struct StringNode {
    u4 Index;               // 0x0000
    u2 Length;              // 0x0004
    u2 Unknown_06;          // 0x0006
    u4 ChildOffset;         // 0x0008
    u4 NextOffset;          // 0x000c
    u1 Data[ ANY_SIZE ];    // 0x0010
};

typedef struct StringNode StringNode;
The real size of the Data member is the value of the Length member.
6. Putting everything together
In the end, I created a custom tool to download and parse the manifest file and be able to download the file I wanted without downloading the full update.
This was immensely helped by the Kaitai framework and its file format description language.
6.1 File format description
The Kaitai Struct description language permits us to quickly assess if the file format structure is correctly reverse-engineered.
The header can be described as follows:
header:
    seq:
      - id: magic
        contents: [ 0x50, 0x34, 0x4B, 0x2D, 0x4D, 0x41, 0x4E, 0x49 ]
      - id: unknown08
        type: u4
      - id: unknown0c
        type: u4
      - id: header_size
        type: u8
      - id: first_record_offset
        type: u8
      - id: num_records
        type: u8
The index record structure can also be described trivially:
index_record:
    seq:
      - id: id
        type: s4
      - id: unknown_value_0
        type: u4
      - id: unknown_value_1
        type: u4
      - id: sha256
        size: 32
      - id: compression_method # 100 -> zstd
        type: u8
      - id: compressed_size
        type: u8
      - id: uncompressed_size
        type: u8
      - id: crc32
        type: u4
      - id: signature
        size: 128
      - id: unknown_value_2
        type: u4
The string node structure is not trivial to describe as it is a binary tree so you need to iterate dynamically on each element of the tree until you reach nodes that verify the end condition.
The trick is to declare the data structure like it is in the binary file and declare virtual members that only exist in the Kaitai stream instance to handle the next and child concept.
string_node:
    seq:
      - id: index
        type: s4
      - id: length
        type: u2
      - id: unknown_06
        type: u2
      - id: child_offset
        type: s4
      - id: next_offset
        type: s4
      - id: data
        type: str
        encoding: ascii
        size: length
    instances:
      child:
        type: string_node
        pos: child_offset
        io: _io
        if: child_offset != -1
      next:
        type: string_node
        pos: next_offset
        io: _io
        if: next_offset != -1
Then the main layout of the manifest file format can be described:
seq:
  - id: header
    type: header
  - id: string_nodes
    type: string_nodes
    size: header.first_record_offset
  - id: index_records
    type: index_record
    repeat: expr
    repeat-expr: header.num_records
You can then view the result of the parsing using the binary file using either the kaitai-struct-visualizer or the Kaitai Web IDE.
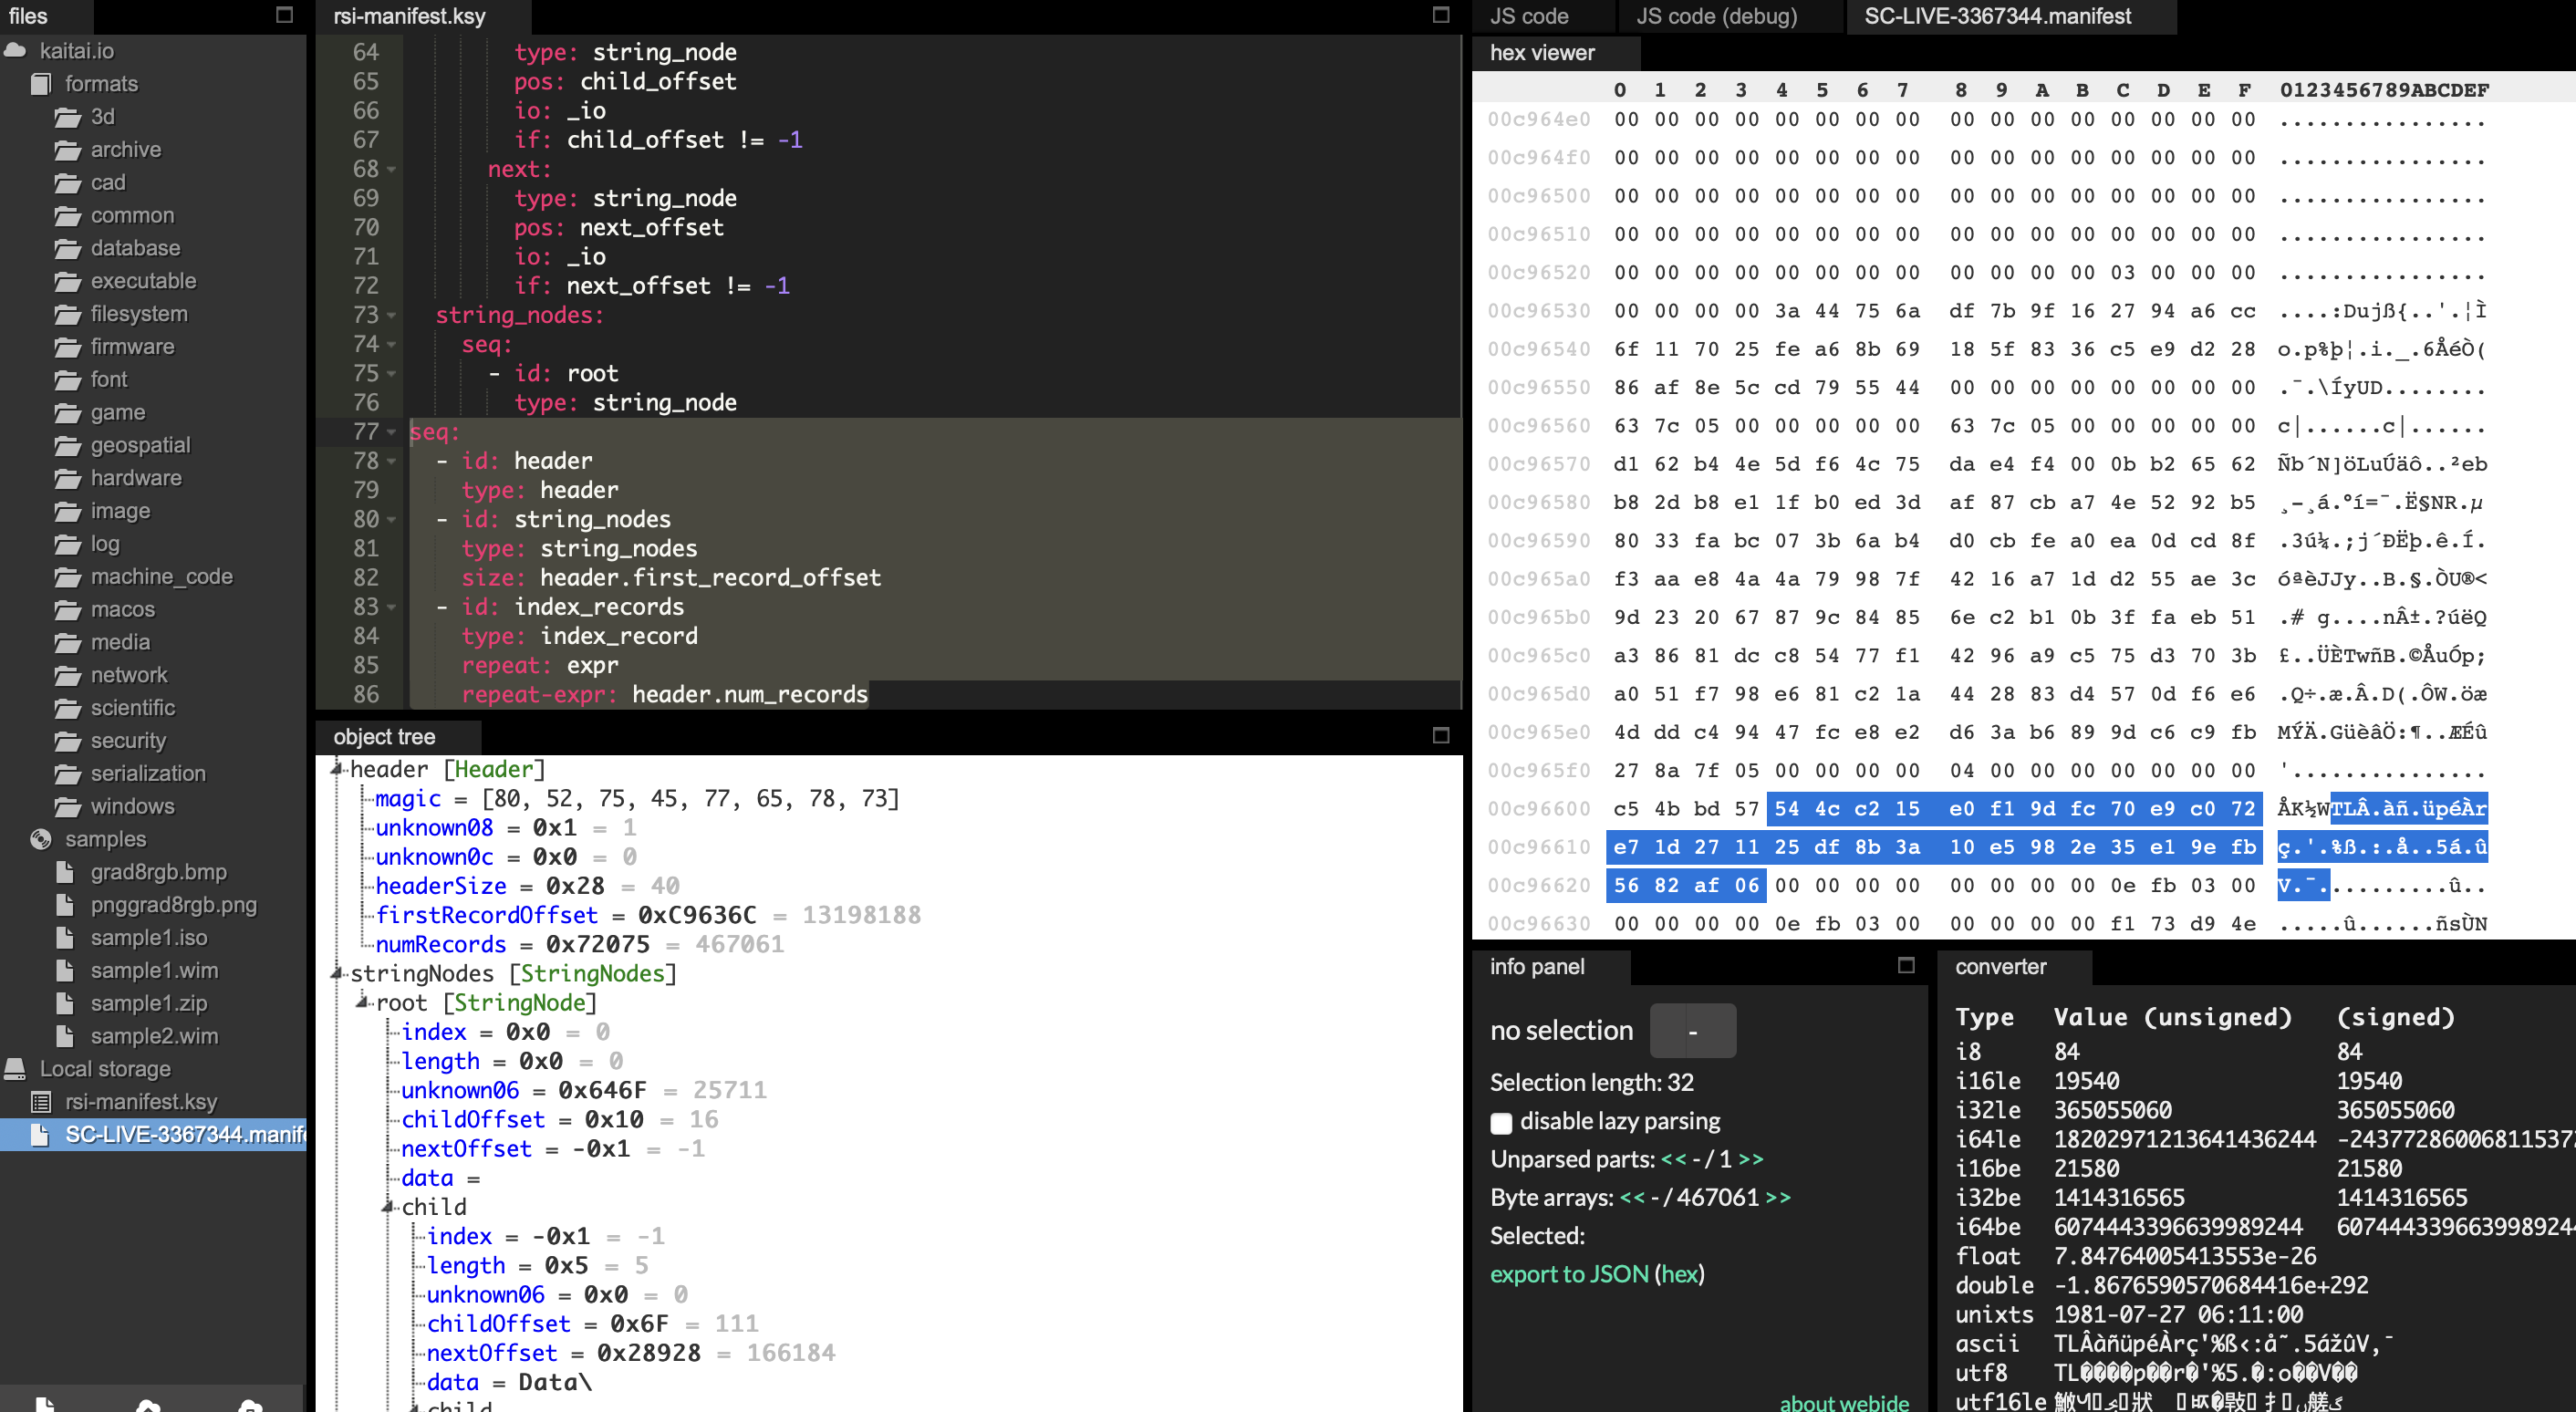
The KSY file used in the screenshots above can be found here.
6.2 Custom tool
Using the Kaitai Struct compiler (ksc) to generate parsing code for the manifest file, I have been able to code a custom tool to download loose files directly from the object store.
The only part not directly handled by ksc is parsing the file path tree and reconstructing them.
The table has to be built recursively like shown below.
buildStringTableRecursive = ( table, node, str, progressCallback ) => {
    if ( node == undefined ) {
        throw Error('Undefined node');
    }

    if ( node.length !== 0 ) {
        str += node.data;
    }

    if ( node.index > 0 ) {
        table.push( { index: node.index, path: str } );
        if ( progressCallback != undefined ) {
            progressCallback( str );
        }
    }

    child = node.child;
    while ( child != undefined ) {
        child = buildStringTableRecursive( table, child, str, progressCallback );
    }

    return node.next;
};

buildStringTable = ( manifest, progressCallback = null, completeCallback = null ) => {
    const table = new Array();

    const root = manifest.stringNodes.root;
    if ( root == undefined || root.index != 0 ) {
        throw Error( 'Ill-formated root node' );
    }

    buildStringTableRecursive( table, root, '', progressCallback );

    if ( completeCallback != undefined ) {
        completeCallback( table );
    }

    return table;
};
Once all strings are built, one path can be matched with one record.
getFileRecord( index ) {
    if ( index <= 0 ) {
        throw Error( 'index <= 0' );
    }

    return this.parsedManifest.indexRecords[ index - 1 ];
}

// example calling code
record = getFileRecord( stringNode.index )
Once the record entry for a particular file is found, we can download it.
const fileRecord = rsiManifestFile.getFileRecord( index );

const objectStore = new ObjectStore( releaseInfo.objects );

objectStore.downloadFile( fileRecord, `${targetFolder}/${filepath}`, filename, ( current, total, percent ) => mainWindow.send( 'manifest@download-file-update', { current: current, total: total, percent: percent } ), null).then( () => {} );
The ObjectStore.downloadFile handles the download of the file from the file URL (from the object store API URL with the sha256 of the file, contained in the fileRecord structure) as well as the decompression of the file using the Zstandard algorithm if needed.
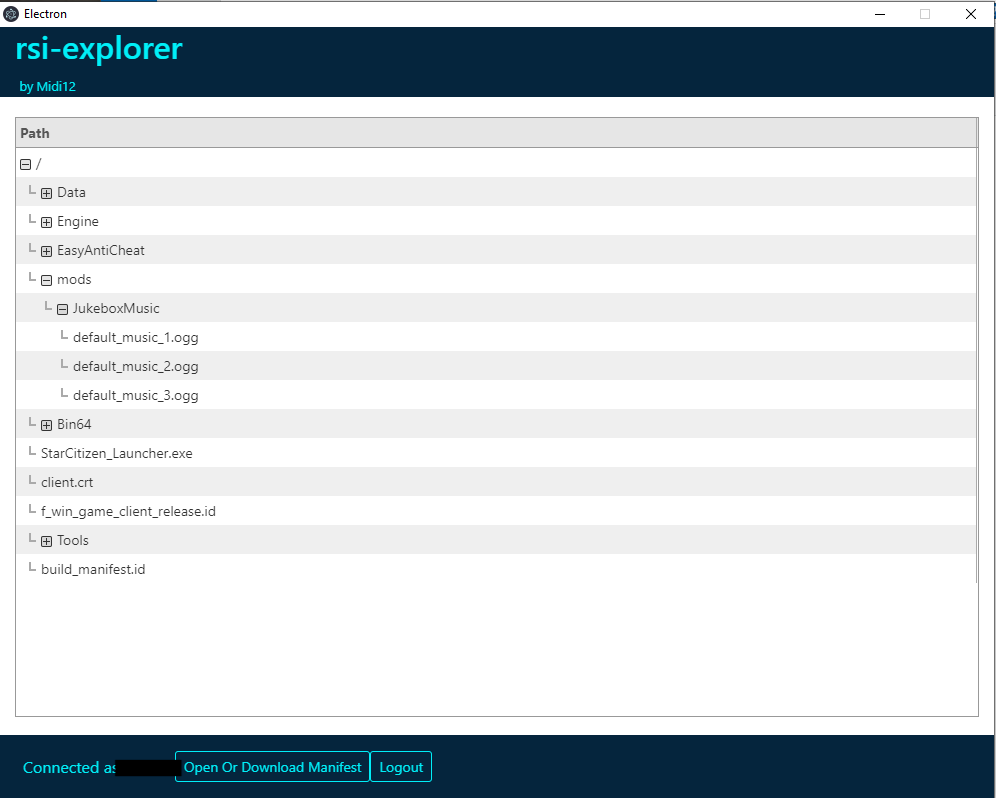
If you are interested in the project the rsi-explorer project can be found here.
End words
I hope you enjoyed discovering the internals of a game launcher and congratulation to read through that wall of text 😊.